


eTOP Sign
eTOP Sign is a simple solution for all documents to get signed digitally using our Wacom Signature pad and Tablets. You can easily review the whole document before applying your signature. Easy to use interface, add signature field dynamically or pre-defined locations.
eTop Solution is a leading supplier in the United Arab Emirates and South African Countries (Nigeria, South Africa, Sudan, Kenya, Uganda, Somalia, South Sudan, Central African Republic, Ethiopia, Tanzania, Saudi Arabia, Oman, Kuwait, Bahrain, and Qatar) for Wacom Signature pad, Fargo Card Printer, Javelin Card Printer, OZAK Turnstile and Speed gates.
eTOPSign enables you to eliminate paper documents generated during a digital business process, for the purpose of being signed by the parties involved in the transaction (as an act of consent for legal/regulatory purposes). No matter what the source systems/applications are or what the file format of the original e-document is, it will be converted to PDF and then presented for review before signing. Electronic handwritten signatures which are digitally sealed can then be captured anywhere desired or pre-positioned in the e-document, using one of the many signing-devices which are supported by eTOPSign.
So FORGET PRINTING-FILING / SCANNING-KEYING-ARCHIVING and all the additional overhead tasks related to printer and paper handling or the tedious tasks needed to convert paper documents back from analog to digital. Now you can stay digital all the way! Just contact us for a product demo today.
- Description
- Additional information
- Reviews (103)
- Remove / Delete Signature
- Adding photos
Description
Adding signatures, stamps, text, and images to a document To add objects to a document, Mouse right click on the page and in the area
where you want to add the signature box/image/stamp/text field. A menu with different options is displayed. Select the type of object you want to add to the document.
Signatures: Drag the dotted frame to the on-page location where you want to insert the signature box. Now click once to fix the object in place. You can drag the frame across all areas of the page, but the frame will disappear in the transition between pages and beyond the page borders. To remove an object, right-click on the mouse and select “X Remove Sig Box”.
A. Stamps: As with adding signatures, after selecting the location where you want to add the stamp box and clicking to fix the object, click the stamp icon in the stamp box to select the desired stamp from the stamps folder, or double-click on the stamp box area to automatically add the predefined default stamp. You can set a default stamp by clicking on the Edit menu> Set Default Stamp.
B. Images: After right-clicking to add the image object, it can be moved and resized before the image is added. After selecting the desired position and size, press to confirm. To remove the object, click on. After confirming, the frame becomes fixed and it will not be possible to change its position or size.
C. Text Field: Adding text fields can help you edit the document as needed, for example adding personal information to forms, etc. You can only add a text field before the document is signed or stamped. When you select Insert Text Field, an ‘I’ cursor appears. Hover with the mouse to the desired location and left-click to position the text field. You can now enter text freely, when you are finished press ENTER. Removing the object is possible by right-clicking the text and selecting Remove Text Field.
Effortlessly Automate Your Processes and Eliminate Paper Handling
Getting etopsign to work in your existing systems is hassle-free and easy. All you have to do is choose doc printer as the printer and print from the core application.
Our special kiosk mode provides an easy way for the customer service representative to share a digital document with their customer. The second screen can have individual mouse control, so both screens can be used to work on two separate tasks simultaneously.
With etopsign, you can establish a set of rules for all your “document types.” Once defined, the software will recognize your document type and automatically insert a signature field. You’ll also be able to configure the document storage location, email dispatch, index criteria, and more within the software.
Additional information
| Industries | Energy & Utilities, Healthcare, Manufacturing, Public Sector, Retail |
|---|
103 reviews for eTOP Sign
Add a review
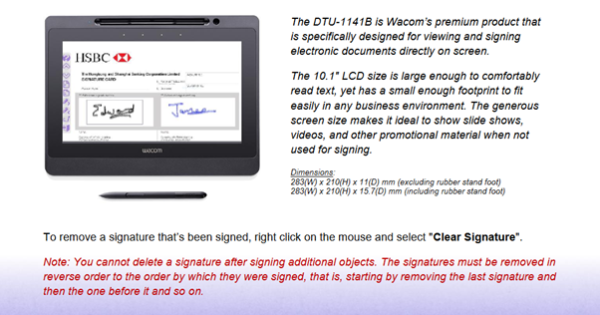
When working with a DTU that has an LCD screen surface, when the document is opened for signing, it is displayed on the main screen as well as on the DTU screen. The signer can only sign with the e-Pen within the signature box(s) in which signatures are required. Using the e-Pen, the signer can also browse the document by sliding it across the document or using the control bar on the STU screen (see picture). When signing is completed, click on the Door icon to exit.
To receive a graphic signature in a document: When working with a computer to which a Wacom STUxxx signature device is connected with an Electronic Pen (e-Pen), in the signature box that needs to be signed, double-click on the signature field in the document, a signature window will appear in the document and a signature menu will be displayed on the device. After signing with the e-Pen and pressing
[OK], the signed signature will be displayed in the document.

Edwardhew –
https://pharmajetzt.com/# PharmaJetzt
Albertshine –
synthroid pharmacy online: united pharmacy naltrexone – telmisartan online pharmacy
Melvinbeilm –
MedicijnPunt: appotheek – Medicijn Punt
Edwardhew –
https://pharmaconnectusa.com/# online pharmacy baclofen
Christaf –
http://medicijnpunt.com/# medicijnen bestellen bij apotheek
Melvinbeilm –
MedicijnPunt: MedicijnPunt – Medicijn Punt
Albertshine –
belgie apotheek online: apotheke holland – Medicijn Punt
Edwardhew –
https://pharmajetzt.shop/# arzneimittel kaufen
Melvinbeilm –
target pharmacy lexapro cost: Pharma Connect USA – Pharma Connect USA
Albertshine –
online medicijnen kopen zonder recept: medicij – MedicijnPunt
Edwardhew –
https://medicijnpunt.shop/# MedicijnPunt
Melvinbeilm –
Medicijn Punt: medicijnen kopen zonder recept – Medicijn Punt
Christaf –
http://pharmaconfiance.com/# malarone ordonnance ou pas
Albertshine –
pharmacie en ligne.com: laboratoire analyse lourdes – Pharma Confiance
Edwardhew –
https://pharmaconfiance.com/# pharmacie de garde à marseille aujourd’hui
Melvinbeilm –
shop apotheke medikamente: Pharma Jetzt – pille kaufen apotheke
Albertshine –
online pharmacy testosterone: online pharmacy reviews 2018 – pharmacy supply store near me
Edwardhew –
https://pharmaconnectusa.shop/# kaiser pharmacy
Melvinbeilm –
apotheek aan huis: medicijnen bestellen apotheek – MedicijnPunt
Christaf –
https://pharmaconfiance.shop/# Pharma Confiance
Edwardhew –
https://pharmajetzt.com/# Pharma Jetzt
Albertshine –
mexican pharmacies: pharmacy online australia – oakdell pharmacy sunday store hours
Melvinbeilm –
inline apotheke: Pharma Jetzt – shop apotheker
Edwardhew –
http://pharmaconnectusa.com/# PharmaConnectUSA
Albertshine –
Pharma Confiance: achat viagra france – vea spray huile seche
Melvinbeilm –
minoxidil viatris: quand prendre monuril – Pharma Confiance
Edwardhew –
https://pharmaconnectusa.com/# accutane pharmacy prices
Christaf –
http://pharmajetzt.com/# PharmaJetzt
Albertshine –
Medicijn Punt: Medicijn Punt – Medicijn Punt
Melvinbeilm –
Pharma Confiance: Pharma Confiance – grd france
Albertshine –
viata online apotheek: online medicatie bestellen – MedicijnPunt
Edwardhew –
http://pharmaconfiance.com/# Pharma Confiance
Melvinbeilm –
Medicijn Punt: online apotheek recept – Medicijn Punt
Albertshine –
Medicijn Punt: Medicijn Punt – apotheke niederlande
Christaf –
https://pharmajetzt.com/# online apotheken
Williamsoorn –
Pharma Jetzt internetapotheken internetapotheke versandkostenfrei
Melvinbeilm –
Pharma Connect USA: PharmaConnectUSA – Pharma Connect USA
Edwardhew –
https://pharmaconnectusa.com/# PharmaConnectUSA
Melvinbeilm –
tegretol online pharmacy: Pharma Connect USA – pharmacy usa store
Edwardhew –
http://pharmaconfiance.com/# laboratoire pharmaceutique paris
Williamsoorn –
Pharma Confiance Pharma Confiance pharmacie de garde hГ©rault
Albertshine –
Viagra Gold: PharmaConnectUSA – PharmaConnectUSA
Melvinbeilm –
versand apotheke: Pharma Jetzt – europa apotheek venlo online
Christaf –
https://pharmajetzt.com/# mediherz shop
Edwardhew –
http://pharmajetzt.com/# pzn medikamente
Melvinbeilm –
wat is mijn apotheek: Medicijn Punt – medicatie apotheker review
Williamsoorn –
Pharma Jetzt sofort lieferung apotheke bad steben apotheke
Albertshine –
univers pharmacie.fr: creme fucidine – pharmacie en ligne suisse sans ordonnance
Melvinbeilm –
Pharma Connect USA: PharmaConnectUSA – PharmaConnectUSA
Edwardhew –
http://medicijnpunt.com/# internetapotheek
Christaf –
https://pharmaconnectusa.shop/# propranolol online pharmacy
Albertshine –
Pharma Confiance: Pharma Confiance – Pharma Confiance
Williamsoorn –
Pharma Confiance Pharma Confiance parapharmacie moins cher paris
Melvinbeilm –
Pharma Confiance: modilac logo – pharmacie grand large
Edwardhew –
https://pharmaconnectusa.com/# Pharma Connect USA
Albertshine –
nhco pharmacie: Pharma Confiance – choc discount solaire
Melvinbeilm –
ordonnance viagra sur internet: Pharma Confiance – Pharma Confiance
Williamsoorn –
Pharma Confiance nexgard chien pharmacie Pharma Confiance
Albertshine –
monuril et grossesse: Pharma Confiance – la pharmacie la moins chГЁre de paris
Melvinbeilm –
300 g en cl: Pharma Confiance – doliprane pour chat avis
Christaf –
https://pharmajetzt.com/# medikamente gГјnstig bestellen
Edwardhew –
http://pharmaconfiance.com/# Pharma Confiance
Albertshine –
Medicijn Punt: de apotheek – recepta online
Melvinbeilm –
Pharma Confiance: produit parapharmaceutique – gcc bordeaux
Williamsoorn –
mijn apotheek medicijnen Medicijn Punt MedicijnPunt
Edwardhew –
https://medicijnpunt.com/# Medicijn Punt
Christaf –
http://medicijnpunt.com/# medicatie bestellen online
Williamsoorn –
medikamente online bestellen auf rechnung online apotheke schweiz apotheke inline
Edwardhew –
http://pharmaconfiance.com/# amoxicilline sirop enfant
Melvinbeilm –
Pharma Connect USA: PharmaConnectUSA – Pharma Connect USA
Albertshine –
MedicijnPunt: medicij – apotheek aan huis
Melvinbeilm –
generic cialis best pharmacy: pharmacy selling viagra – cheap viagra pharmacy
Albertshine –
Pharma Confiance: Pharma Confiance – Pharma Confiance
Edwardhew –
https://pharmajetzt.com/# PharmaJetzt
Williamsoorn –
Medicijn Punt MedicijnPunt Medicijn Punt
Melvinbeilm –
Pharma Connect USA: target pharmacy – Pharma Connect USA
Albertshine –
Pharma Confiance: combien peut on prendre de ketoprofene par jour – Pharma Confiance
Edwardhew –
https://pharmaconfiance.shop/# choc discount solaire
Melvinbeilm –
med apotheek: online apotheek zonder recept – apteka online holandia
Jamesamoup –
TijuanaMeds TijuanaMeds purple pharmacy mexico price list
OscarCen –
indian pharmacies safe: IndiMeds Direct – buy medicines online in india
SteveUncem –
https://indimedsdirect.com/# online pharmacy india
Josephpag –
TijuanaMeds: TijuanaMeds – reputable mexican pharmacies online
Jamesamoup –
mail order pharmacy india best india pharmacy IndiMeds Direct
OscarCen –
mail order pharmacy india: online shopping pharmacy india – pharmacy website india
DavidAppen –
http://canrxdirect.com/# canada drugs online review
SteveUncem –
https://tijuanameds.shop/# TijuanaMeds
Josephpag –
buying prescription drugs in mexico online: medicine in mexico pharmacies – TijuanaMeds
Jamesamoup –
IndiMeds Direct buy medicines online in india top 10 pharmacies in india
SteveUncem –
https://tijuanameds.com/# mexico pharmacies prescription drugs
Josephpag –
canadian pharmacy meds reviews: canadian pharmacy scam – legitimate canadian pharmacies
Jamesamoup –
reputable indian pharmacies indian pharmacies safe Online medicine order
Josephpag –
canadian world pharmacy: CanRx Direct – canadian pharmacy world
Jamesamoup –
canadapharmacyonline com CanRx Direct buy canadian drugs
SteveUncem –
https://tijuanameds.shop/# mexican online pharmacies prescription drugs
Josephpag –
indian pharmacy paypal: online pharmacy india – IndiMeds Direct
SteveUncem –
https://indimedsdirect.shop/# indian pharmacies safe
Jamesamoup –
TijuanaMeds TijuanaMeds TijuanaMeds
DavidAppen –
https://indimedsdirect.shop/# IndiMeds Direct
Josephpag –
IndiMeds Direct: world pharmacy india – top 10 pharmacies in india
OscarCen –
mexican drugstore online: medication from mexico pharmacy – TijuanaMeds
Josephpag –
onlinecanadianpharmacy 24: reliable canadian online pharmacy – canadian world pharmacy
OscarCen –
canadian pharmacy world: CanRx Direct – safe reliable canadian pharmacy